


When you order a burger with fries in any restaurant in America, the waiter often brings a bottle of ketchup to the table before the burger is even ready to be served. Though you may not have explicitly asked for ketchup, the waiter assumes you’ll be asking for it, since most Americans eat burgers with ketchup. But what if the waiter’s optimization was incorrect and you had wanted mayo instead? In the context of a restaurant the waiter’s error adds a slight delay to the enjoyment of your meal and can be assumed to be a mild inconvenience. But what if in the worst case scenario, the condiment you so wanted took so long to arrive that your burger turned cold in the midst of waiting? Annoying isn’t it?
Similar to how the waiter pre-optimized your choice of condiment, modern browsers have various techniques like resource hints to boost performance by guessing where a user will navigate to next. Resource hints like prefetch enable you to get critical resources ahead of time and save valuable (next) render time. However, the decision on what to prefetch when is by nature speculative. We, as developers, make assumptions about the user journey and the routes they will take. As we observed in the case of the condiment incident earlier, speculative pre-fetching can be wasteful since the resources fetched will never be used. This is where predictive prefetching can come in handy. By combining advances in machine learning with analytics data, we can significantly increase the efficacy of our fetches.
Prefetch Options
Before we dive into how we can implement predictive prefetches in our applications, let’s take a moment to explore our options when it comes to prefetching. There are three main types of prefetching available in most modern browsers, they are link prefetching, DNS prefetching, and prerendering. Of the three, link prefetch is the most popular.
DNS Prefetch
DNS prefetching is a mechanism that allows the browser to perform DNS lookups for future page requests in the background while a user is browsing a page. Ordinarily, when a user navigates to another page, the browser must perform a DNS lookup and resolve the domain name to an IP address before establishing a connection for future data transfer. This process, of course, takes time. Though DNS requests in general are small in terms of bandwidth, latency can be quite high, especially on mobile networks. Moreover, more complex pages require more DNS lookups and can slow down the overall page load speed. DNS prefetch reduces latency since DNS resolution is done before a user even navigates to the next page.
Link Prefetch
Link prefetch is similar to DNS prefetch, except it goes one step further. Not only does it enable the browser to do DNS resolution, it also allows browsers to fetch resources, and store them in the cache in preparation for a user’s navigation to that particular page.
Prerendering
Prerendering is the most cost intensive of the prefetch options available and is in a way of combination of the above two options discussed. In addition to doing DNS resolution, and link prefetch, prerendering does the heavy lifting of rendering the entire page in the background, fonts, assets and all. Because of how bandwidth-heavy prerendering can be, it’s the least recommended approach to prefetching.
Moving from speculative to predictive
A common approach to implementing prefetch in applications is by hard coding links into pages. Though these decisions are frequently driven by existing analytics data, they are inherently error prone. Prefetch links can quickly become stale from infrequent updates, and prefetches don’t respond to user feedback. A better solution is to predict where a user will go and prefetch resources accordingly, in other words, predictively prefetch.
Predicting future clicks
In the case of predictive prefetching, we’re determining the best possible outcome based on data that we collected tracking user navigation. Let’s say that we specifically have information about a user’s page view before they navigated to the current page. Based on this data, we can get a broad sense of user flows and calculate the likelihood of them navigating to a page given their current page. From the example data below, we know that 2 out of 4 users navigated to the /menu route from /about, so the probability that any user navigating to /menu from /about is about 50%. Similarly, we can calculate that 25% of users will navigate from /menu to /contact because 1 out of a total of 4 users did just that.
| Previous Page | Current Page | Occurrences |
|---|---|---|
| /about | /menu | 2 |
| /about | /contact | 2 |
| /menu | /contact | 1 |
| /menu | /about | 1 |
| /menu | / | 2 |
Predictive irl
The theory of it sort of works but let’s see if this works in practice. The data on tracking user navigation can be easily sourced from Google Analytics (GA). You can view this data in the GA dashboard by navigating to behavior > site content > all pages and clicking on the navigation summary tab. For clarity, we’ll be looking at the raw data pulled from the Google Analytics API. We’ll focus primarily on the data rows portion (see below). The dimensions attribute is an array that shows you previous page path, and next page path respectively. The metrics values attribute is an array with pageviews, and exits respectively.
{
  "columnHeader": {
    ...
  },
  "data": {
    "rows": [
      ...
      {
        "dimensions": [ "/", "/about" ], //previous page, next page
        "metrics": [
          { "values": [ "1", "0" ] } // pageviews, exits
        ]
      },
      {
        "dimensions": [ "/", "/posts/" ], //previous page, next page
        "metrics": [
          { "values": [ "4", "0" ] } // pageviews, exits
        ]
      },
      {
        "dimensions": [ "/", "/contact/" ], //previous page, next page
        "metrics": [
          { "values": [ "1", "0" ] } // pageviews, exits
        ]
      },
      ...
    ],
    ...
  }
}
Notice that there are 3 possible paths that users took from / in our example app. Let’s aggregate this so it’s a bit clearer to read. If you’re curious how I did this feel free to check out that piece of the code here, it’s heavily inspired by how GuessJS handles GA.
{
  "/": {
    "pagePath": "/",
    "pageviews": 6, // exits + nextPageviews
    "exits": 0,
    "nextPageviews": 6, //all pageviews from next pages array
    "nextExits": 0,
    "nextPages": [
      {
        "pagePath": "/posts/",
        "pageviews": 4
      },
      {
        "pagePath": "/about/",
        "pageviews": 1
      },
      {
        "pagePath": "/contact/",
        "pageviews": 1
      }
    ],
    "percentExits": 0,
    "topNextPageProbability": 0.6666666666666666
  }
  ...
}
From our aggregated data, we see that 4 user went to /posts, 1 user went to /about and 1 user went to /contact. Based on this, we can calculate that out of a total of 6 pageviews, 4 went to /posts from /, which is the highest number of pageviews of all the next pages viewed. So the probability of a user navigating to /posts is 4/6 or ~0.6666.
Calculating the probability is all well and good but the real performance trick comes from using that metric to implement next page fetches. For this, we’ll be implementing a build script into 11ty.js, which is a wonderful, highly performance static site generator built by the incomparable Zach Leatherman. If you’ve never worked with 11ty, no sweat, the docs and starter projects are great places to start.
Pulling data into 11ty
To start, we’ll be creating a data file accessible globally in 11ty. In 11ty, global data files are generally stored in the _data directory. So your file directory would look something like this:
�"��"��"� .eleventy.js �"��"��"� package.json �"��"��"� src �"� �"��"��"� _data �"� �"� �"��"��"� prefetchLinks.js // file we're creating �"� �"� �""�"��"� metadata.json �"� �"��"��"� _includes �"� �""�"��"� ...
We’ll create a file called prefetchLinks.js that will make a call to the GA API, aggregate the data and return an array of objects containing all pages, the most likely next page page associated with them and the probability percentage of that particular action. The output of that function should look something like this:
{
  "pagePath": "/about/",
  "nextPagePath": "/contact/",
  "nextPageCertainty": 0.5
},
{
  "pagePath": "/menu/",
  "nextPagePath": "/contact/",
  "nextPageCertainty": 1
},
...
Custom data pulled from an external API is exposed globally to 11ty via module.exports. So we’ll start by creating a function that attempts to call the GA API. In order to access Google’s APIs we’ll first have to authenticate our request. For this demo, we’ll be using service account keys in PEM format. Remember that this is a private key, so don’t add this to version control! For more on configuring the auth piece of this, check out the authentication notes in the README of the demo project.
const {google} = require('googleapis')
const fs = require('fs')
const path = require('path')

const queryParams = {
...
}

const aggregatePages = async (pages) => {
  ...
  return predictions
}

const authClient = new google.auth.JWT({
  email: process.env.SERVICE_ACCOUNT_EMAIL,
  key: fs.readFileSync(path.join(__dirname, "../../key.pem"), 'utf8'),
  scopes: ['https://www.googleapis.com/auth/analytics.readonly']
})

module.exports = async function() {
  try {
    await authClient.authorize()
    const analytics = google.analyticsreporting({
      version: 'v4',
      auth: authClient
    })
    const response = await analytics.reports.batchGet(queryParams)
    let [report] = response.data.reports

    const predictions = await aggregatePages(report);

    return predictions
  } catch (err) {
    console.log("err")
    return err
  }
}
With the authentication piece hooked up, we can now make a call to GA to grab our raw analytics data by calling analytics.reports.batchGet and passing in some query parameters like start and end dates. Following this we can pass that raw data to an aggregator function that will aggregate our data and give us the array of predictions that we’ll need.
Wrangling markup in 11ty
With our predictions accessible in the global data, we can now update our markup files with the relevant prefetch tags. To do this, we’ll have to create some templating logic that adds a prefetch link depending on whether or not a page has a high probability of a next page click through. 11ty uses nunjucks by default, so we’ll be sprinkling some nunjucks templating magic in our base nunjucks template.
<!doctype html>
<html lang="en">
  <head>
    <meta charset="utf-8">
    <meta name="viewport" content="width=device-width, initial-scale=1.0">
    <title>{{ renderData.title or title or metadata.title }}</title>
    ...

    {% for entry in prefetchLinks %}
      {# {% if entry.pagePath.replace("-", "") == page.url %} #}
        <link rel="prefetch" href="{{ entry | prefetchNextURL }}">
      {# {% endif %} #}
    {%- endfor -%}
  </head>
In our base partial located at src/_includes/layouts, we’ll iterate over our available array of prefetchLinks. Because data defined in the _data folder is globally available in 11ty, we can simply use the data in our template. Note that the variable name needs to match the name of the file, prefetchLinks in our case. Within the iterator, we’ll check whether or not the current url matches any of the given urls from our analytics, and if it does, we’ll add our prefetch link. For this to be fully operational, we’ll need to add one more step to our 11ty build that pulls the next page link we want. Remember our data item is currently an object:
{
  "pagePath": "/about/",
  "nextPagePath": "/contact/",
  "nextPageCertainty": 0.5
}
To get our links, we’ll specifically be making use of filters using the 11ty configuration API. This also allows us to only prefetch a link if it’s over a specific threshold. So assuming a threshold of 0.5, only prefetch links where we’re 50% certain that a user will go there.
var THRESHOLD = 0.5;
eleventyConfig.addFilter('prefetchNextURL', (entry, url) => {
  // check threshold //
  if (entry.nextPageCertainty > THRESHOLD) {
    return entry.nextPagePath
  }
})
With this, we now have a working site that makes use of predictive prefetch! Tada!
Use with caution
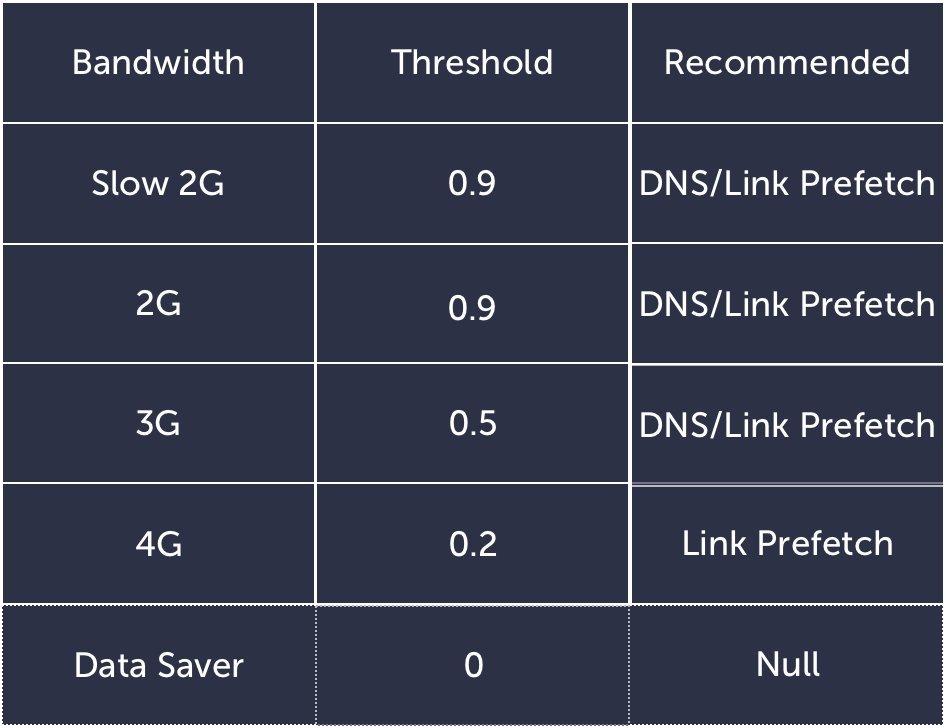
Predictively Prefetching is a powerful way of optimizing your sites for speed by fetching resources ahead of time and using data to back our decisions on what and how to prefetch. Even so, moderation is key if we want to guarantee speed boosts with prefetch. Prefetching pre-emptively on every page can slow down current page load and ruin a user’s current experience in anticipation of their next move. To prefetch effectively, we need to be mindful of the bandwidth and device that a user is on to make an optimal calculation on whether or not to prefetch. For users on slow 2G connections for instance, prefetching may lead to more lag. As a result, we may want to bump up the threshold for prefetch as opposed to someone on a faster 4G connection. Similarly, we need to take into account the user’s preference for saving data and factor that into our calculations.
The convergence of machine learning and web performance is still in its infancy. However, with the growing popularity of machine learning, it’s only a matter of time when techniques like predictive prefetching will become more commonplace on the web.
If you’re keen on diving into this concept more, check out GuessJS, a project that Minko Gechev and the team at Google have been working on, as well the full talk I gave about this at Performance.now().